[pgAdmin](https://www.pgadmin.org/) is a client application for [[Postgres]], providing a GUI to create and manage databases.
## Installation
pgAdmin is installed by default when installing Posgres. If you elected not to install pgAdmin when installing Postgres, follow the instructions below.
[Download](https://www.pgadmin.org/download/) the pgAdmin installer for your operating system. Click the `.exe` file to install.
> [!tip]
> A Python package is available for those wishing to run pgAdmin as a web application in a Python environment. Learn more [here](https://www.pgadmin.org/download/pgadmin-4-python/).
> [!example]- Installation Screens
>
> 
>
> 
>
> 
>
> 
>
> 
>
> 
>
>
## Getting Started
1. Open pgAdmin.
2. When pgAdmin first opens, you may be prompted to set a password. Write this down and don't lose it!
3. At first, you should see one server in the *Browser tree* (left sidebar). This server was created when you installed Postgres along with a database named `postgres`. Click the server to select. You will be prompted for the password. Provide the superuser password you created when you installed Postgres.
4. To create a new database, drill down into the *Browser tree* and select the *Databases (1)* database cluster. In the **Object** menu, select **Create > Database**. A dialog box will appear. Provide a name and optionally, comment, and click **Save**.
You can now use pgAdmin to manipulate the database through its graphical user interface. You can also use either the **Query Tool** to write SQL statements or the **PSQL Tool** to use [[psql]]. If you receive the error *Please configure the PostgreSQL Binary Path in the Preferences dialog*, you must [[#register the binary path for psql]].
> [!info]
> At first, pgAdmin can seem overwhelmingly complex. It's useful to understand the Postgres [client/server](https://www.postgresql.org/docs/15/tutorial-arch.html) model. pgAdmin is the client application; a server process, named `postgres`, manages operations on the database. A single server can manage multiple databases, referred to as a database *cluster*.
## Common Workflows
Click the help button for help with any dialog box. 
### Create a table
To create a new table, expand the *Browser tree* for the database to select **Schemas > public**. In the **Object** menu, select **Create > Table** (or right-click the **Table** item in the *Browser tree*). A dialog box will appear. Provide a name for the table under the General tab and the desired columns in the column tab.
### Import CSV
pgAdmin provides a dialog utility for importing data from CSV. First [[#create a table]] with the correct columns. Then, in the *Browser tree*, navigate to the table, right-click, and select **Import/Export**. If you receive the error *Please configure the PostgreSQL Binary Path in the Preferences dialog*, you must [[#register the binary path for psql]].
### Import CSV from web
You can read a file directly from the web, avoiding the need to download the file locally. See instructions in [[psql]].
### Auto-incrementing ID field
1. If the table already exists, open the table properties dialog box. If not, [[#create a table]].
2. Edit the column by selecting the pencil icon.
3. In the edit field dialog box, select the Constraints tab (not the Constraints tab at the top of the dialog box).
4. Change the "Type" to "Identity" and change the "Identity" to "ALWAYS". The remaining fields will be filled automatically after you save, but you can edit them now if desired.
5. Click **Save**.
### Writing and saving SQL queries
A common workflow when developing SQL queries is to write the query in the Query Tool (Alt + Shift + Q) to draft the query and, once satisfied with the result, save the query to a `.sql` file. Store these in a `sql/` folder in the project repository. You can load the `.sql` file in the Query Tool for future use. For very common queries, you should instead [[#create a view]].
### Create a view
Views are calculated tables. Create a view by simply adding the following line to the top of your SQL query.
```sql
CREATE VIEW IF NOT EXISTS view_name AS
```
### Update records
Be sure to not edit records that will be overwritten on the next import. Instead, edit the data source, drop the existing table, and read in the new one.
```sql
UPDATE <tablename> SET <field> = <value>, <field_2> = <value_2> WHERE id = <id>;
```
### Drop tables or views
Sometimes you'll want to drop many tables or all tables in a database and start fresh with the same schema. Use `CASCADE` to remove foreign keys from related tables.
```sql
DROP TABLE IF EXISTS table_name CASCADE;
DROP VIEW IF EXISTS view_name;
```
## Register the binary path for psql
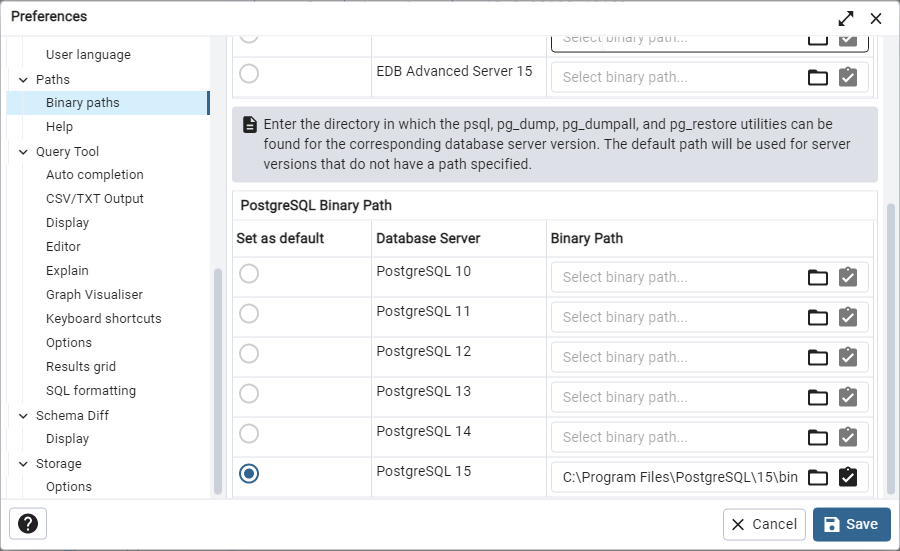
If you receive the error *Please configure the PostgreSQL Binary Path in the Preferences dialog* when using pgAdmin, you need to register the binary path for `psql` for the version of Postgres you are using.
1. Open **File > Preferences**.
2. Select **Binary paths** in the left sidebar.
3. In the PostreSQL Binary Path table, identify the Database Server associated with your version of PostgreSQL and enter the directory in which the `psql`, `pg_dump`, `pg_dumpall`, and `pg_restore` utilities can be found for the corresponding database server version. If you have already registered [[psql]] to your PATH variable, you can use `which psql` in a [[Bash]] session. For me, the correct path is
```
C:\Progarm Files\PostgreSQL\15\bin
```
4. Select this version of PostgreSQL as the default.
#rough