[Develop an App with Vertex AI Gemini 1.0 Pro](https://www.cloudskillsboost.google/focuses/86788?catalog_rank=%7B%22rank%22%3A1%2C%22num_filters%22%3A0%2C%22has_search%22%3Atrue%7D&parent=catalog&search_id=31558993)
### Activate Cloud Shell
Cloud Shell is a virtual machine that contains development tools. It offers a persistent 5-GB home directory and runs on Google Cloud. Cloud Shell provides command-line access to your Google Cloud resources. `gcloud` is the command-line tool for Google Cloud. It comes pre-installed on Cloud Shell and supports tab completion.
1. Click the **Activate Cloud Shell** button () at the top right of the console.
2. Click **Continue**.
It takes a few moments to provision and connect to the environment. When you are connected, you are also authenticated, and the project is set to your _PROJECT_ID_.
## Task 1. Configure your environment and project
1. Sign in to the Google Cloud console with your lab credentials, and open the **Cloud Shell** terminal window.
2. To set your project ID and region environment variables, in Cloud Shell, run the following commands:
```
PROJECT_ID=$(gcloud config get-value project)
REGION=us-west1
echo "PROJECT_ID=${PROJECT_ID}"
echo "REGION=${REGION}"
```
3. In order to use various Google Cloud services in this lab, you must enable a few APIs:
```
gcloud services enable cloudbuild.googleapis.com cloudfunctions.googleapis.com run.googleapis.com logging.googleapis.com storage-component.googleapis.com aiplatform.googleapis.com
```
## Task 2. Set up the application environment
In this task, you set up a Python virtual environment, and install the application dependencies.
### Confirm that Cloud Shell is authorized
1. To confirm that Cloud Shell is authorized, in Cloud Shell, run the following command:
```
gcloud auth list
```
2. If you're asked to authorize Cloud Shell, click **Authorize**.
### Create the app directory
1. To create the app directory, run the following command:
```
mkdir ~/gemini-app
```
2. Change to the `~/gemini-app` directory:
```
cd ~/gemini-app
```
The application files are created in the `~/gemini-app` directory. This directory will contain the Python application source files, dependencies, and a Docker file which we will use later in this lab.
### Set up a Python virtual environment
Create a virtual environment on top of the existing Python installation, so that any packages installed in this environment are isolated from the packages in the base environment. When used from within a virtual environment, installation tools such as `pip` will install Python packages into the virtual environment.
1. To create the Python virtual environment, from within the `gemini-app` folder, run the command:
```
python3 -m venv gemini-streamlit
```
The _venv_ module creates a lightweight virtual environment, with its own independent set of Python packages.
2. Activate the Python virtual environment:
```
source gemini-streamlit/bin/activate
```
### Install application dependencies
A Python requirements file is a simple text file that lists the dependencies required by your project. To start, there are three modules we need in our requirements file.
Our app is written using [Streamlit](https://streamlit.io/), an open-source Python library that is used to create web apps for machine learning and data science. The app uses the Vertex AI SDK for Python library to interact with the Gemini API and models. [Cloud Logging](https://cloud.google.com/logging) is used to log information from our application.
1. To create the **requirements** file, run the following command:
```
cat > ~/gemini-app/requirements.txt <<EOF
streamlit
google-cloud-aiplatform==1.38.1
google-cloud-logging==3.6.0
EOF
```
2. Install the application dependencies:
```
pip install -r requirements.txt
```
[pip](https://pypi.org/project/pip) is the package installer for Python.
Wait until all the packages are installed before continuing to the next task.
## Task 3. Develop the app
The app source code will be written in mutliple .py source files. Let's start with the main entry point in `app.py`.
### Write the main app entry point
1. To create the `app.py` entry point code, run the following command:
```
cat > ~/gemini-app/app.py <<EOF
import os
import streamlit as st
from app_tab1 import render_story_tab
from vertexai.preview.generative_models import GenerativeModel
import vertexai
import logging
from google.cloud import logging as cloud_logging
# configure logging
logging.basicConfig(level=logging.INFO)
# attach a Cloud Logging handler to the root logger
log_client = cloud_logging.Client()
log_client.setup_logging()
PROJECT_ID = os.environ.get('PROJECT_ID') # Your Qwiklabs Google Cloud Project ID
LOCATION = os.environ.get('REGION') # Your Qwiklabs Google Cloud Project Region
vertexai.init(project=PROJECT_ID, location=LOCATION)
@st.cache_resource
def load_models():
text_model_pro = GenerativeModel("gemini-pro")
multimodal_model_pro = GenerativeModel("gemini-pro-vision")
return text_model_pro, multimodal_model_pro
st.header("Vertex AI Gemini API", divider="rainbow")
text_model_pro, multimodal_model_pro = load_models()
tab1, tab2, tab3, tab4 = st.tabs(["Story", "Marketing Campaign", "Image Playground", "Video Playground"])
with tab1:
render_story_tab(text_model_pro)
EOF
```
2. View the contents of the `app.py` file:
```
cat ~/gemini-app/app.py
```
The app uses `streamlit` to create a number of tabs in the UI. In this initial version of the app, we build the first tab **Story** that contains functionality to generate a story, and then incrementally build the other tabs in subsequent tasks in the lab.
The app first initializes the `Vertex AI SDK` passing in the values of the PROJECT_ID, and REGION environment variables.
It then loads the `gemini-pro`, and `gemini-pro-vision` models using the `GenerativeModel` class that represents a Gemini model. This class includes methods to help generate content from text, images, and video.
The app creates 4 tabs in the UI named **Story**, **Marketing Campaign**, **Image Playground**, and **Video Playground**.
The app code then invokes the `render_tab1()` function to create the UI for the **Story** tab in the app's UI.
### Develop tab1 - Story
1. To write code that renders the **Story** tab in the app's UI, run the following command:
```
cat > ~/gemini-app/app_tab1.py <<EOF
import streamlit as st
from vertexai.preview.generative_models import GenerativeModel
from response_utils import *
import logging
# create the model prompt based on user input.
def generate_prompt():
# Story character input
character_name = st.text_input("Enter character name: \n\n",key="character_name",value="Mittens")
character_type = st.text_input("What type of character is it? \n\n",key="character_type",value="Cat")
character_persona = st.text_input("What personality does the character have? \n\n",
key="character_persona",value="Mitten is a very friendly cat.")
character_location = st.text_input("Where does the character live? \n\n",key="character_location",value="Andromeda Galaxy")
# Story length and premise
length_of_story = st.radio("Select the length of the story: \n\n",["Short","Long"],key="length_of_story",horizontal=True)
story_premise = st.multiselect("What is the story premise? (can select multiple) \n\n",["Love","Adventure","Mystery","Horror","Comedy","Sci-Fi","Fantasy","Thriller"],key="story_premise",default=["Love","Adventure"])
creative_control = st.radio("Select the creativity level: \n\n",["Low","High"],key="creative_control",horizontal=True)
if creative_control == "Low":
temperature = 0.30
else:
temperature = 0.95
prompt = f"""Write a {length_of_story} story based on the following premise: \n
character_name: {character_name} \n
character_type: {character_type} \n
character_persona: {character_persona} \n
character_location: {character_location} \n
story_premise: {",".join(story_premise)} \n
If the story is "short", then make sure to have 5 chapters or else if it is "long" then 10 chapters.
Important point is that each chapter should be generated based on the premise given above.
First start by giving the book introduction, chapter introductions and then each chapter. It should also have a proper ending.
The book should have a prologue and an epilogue.
"""
return temperature, prompt
# function to render the story tab, and call the model, and display the model prompt and response.
def render_story_tab (text_model_pro: GenerativeModel):
st.write("Using Gemini 1.0 Pro - Text only model")
st.subheader("Generate a story")
temperature, prompt = generate_prompt()
config = {
"temperature": temperature,
"max_output_tokens": 2048,
}
generate_t2t = st.button("Generate my story", key="generate_t2t")
if generate_t2t and prompt:
# st.write(prompt)
with st.spinner("Generating your story using Gemini..."):
first_tab1, first_tab2 = st.tabs(["Story response", "Prompt"])
with first_tab1:
response = get_gemini_pro_text_response(text_model_pro, prompt, generation_config=config)
if response:
st.write("Your story:")
st.write(response)
logging.info(response)
with first_tab2:
st.text(prompt)
EOF
```
The `render_story_tab` function generates the UI controls in the tab by invoking functions to render the text input fields, and other options.
The `generate_prompt` function generates the text prompt that is supplied to the Gemini API. The prompt string is created by concatenating user entered values in the tab UI for the character of the story, and options such as the story length (short, long), creativity level (low, high), and the story premise.
The function also returns a `temperature` value based on the selected creativity level of the story. This value is supplied as the `temperature` configuration parameter to the model, which controls the randomness of the model's predictions. The `max_output_tokens` configuration parameter specifies the maximum number of output tokens to generate per message.
To generate the model response, a button is created in the tab UI. When the button is clicked, the `get_gemini_pro_text_response` function is invoked, which we will code in the next step in the lab.
### Develop response_utils
The `response_utils.py` file contains functions to generate the model's responses.
1. To write code to generate the model's text response, run the following command:
```
cat > ~/gemini-app/response_utils.py <<EOF
from vertexai.preview.generative_models import (Content,
GenerationConfig,
GenerativeModel,
GenerationResponse,
Image,
HarmCategory,
HarmBlockThreshold,
Part)
def get_gemini_pro_text_response( model: GenerativeModel,
prompt: str,
generation_config: GenerationConfig,
stream=True):
safety_settings={
HarmCategory.HARM_CATEGORY_HARASSMENT: HarmBlockThreshold.BLOCK_NONE,
HarmCategory.HARM_CATEGORY_HATE_SPEECH: HarmBlockThreshold.BLOCK_NONE,
HarmCategory.HARM_CATEGORY_SEXUALLY_EXPLICIT: HarmBlockThreshold.BLOCK_NONE,
HarmCategory.HARM_CATEGORY_DANGEROUS_CONTENT: HarmBlockThreshold.BLOCK_NONE,
}
responses = model.generate_content(prompt,
generation_config = generation_config,
safety_settings = safety_settings,
stream=True)
final_response = []
for response in responses:
try:
final_response.append(response.text)
except IndexError:
final_response.append("")
continue
return " ".join(final_response)
EOF
```
The `get_gemini_pro_text_response` function uses the `GenerativeModel` and some of the other classes from the `vertexai.preview.generative_models` package in the Vertex AI SDK for Python. From the `generate_content` method of the class, a response is generated using the text prompt that is passed to the method.
A `safety_settings` object is also passed to this method to control the model response by blocking unsafe content. The sample code in this lab uses safety setting values that instructs the model to always return content regardless of the probability of the content being unsafe. You can assess the content generated, and then adjust these settings if your application requires more restrictive configuration. To learn more, view the [safety settings documentation](https://ai.google.dev/docs/safety_setting_gemini).
## Task 4. Run and test the app locally
In this task, you run the app locally using `streamlit`, and test the app functionality.
### Run the app
1. To run the app locally, in Cloud Shell, execute the command:
```
streamlit run app.py \
--browser.serverAddress=localhost \
--server.enableCORS=false \
--server.enableXsrfProtection=false \
--server.port 8080
```
1. The app starts and you are provided a URL to access the app.
2. To launch the app home page in your browser, click **web preview** in the Cloud Shell menu bar, and then click **Preview on port 8080**.
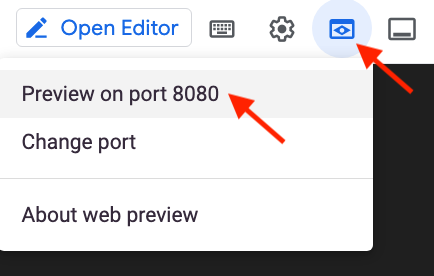
You can also copy and paste the app URL in a separate browser tab to access the app.
## Task 14. Deploy the app to Cloud Run
Now that you've tested the app locally, you can make it available to others by deploying the app to Cloud Run on Google Cloud. Cloud Run is a managed compute platform that lets you run application containers on top of Google's scalable infrastructure.
### Set up the environment
1. Make sure you are in the `app` directory:
```
cd ~/gemini-app
```
2. Verify that the PROJECT_ID, and REGION environment variables are set:
```
echo "PROJECT_ID=${PROJECT_ID}"
echo "REGION=${REGION}"
```
3. If these environment variables are not set, then run the command to set them:
```
PROJECT_ID=$(gcloud config get-value project)
REGION=us-west1
echo "PROJECT_ID=${PROJECT_ID}"
echo "REGION=${REGION}"
```
4. Set environment variables for your service and artifact repository:
```
SERVICE_NAME='gemini-app-playground' # Name of your Cloud Run service.
AR_REPO='gemini-app-repo' # Name of your repository in Artifact Registry that stores your application container image.
echo "SERVICE_NAME=${SERVICE_NAME}"
echo "AR_REPO=${AR_REPO}"
```
### Create the Docker repository
1. To create the repository in Artifact Registry, run the command:
```
gcloud artifacts repositories create "$AR_REPO" --location="$REGION" --repository-format=Docker
```
Artifact Registry ia a Google Cloud service that provides a single location for storing and managing your software packages and Docker container images.
2. Set up authentication to the repository:
```
gcloud auth configure-docker "$REGION-docker.pkg.dev"
```
### Build the container image
We'll use a `Dockerfile` to build the container image for our application. A `Dockerfile` is a text document that contains all the commands that a user could call on the command line to assemble a container image. It is used with [Docker](https://docs.docker.com/get-started/overview/), a container platform that builds and runs container images.
1. To create a `Dockerfile`, run the command:
```
cat > ~/gemini-app/Dockerfile <<EOF
FROM python:3.8
EXPOSE 8080
WORKDIR /app
COPY . ./
RUN pip install -r requirements.txt
ENTRYPOINT ["streamlit", "run", "app.py", "--server.port=8080", "--server.address=0.0.0.0"]
EOF
```
2. To build the container image for your app, run the command:
```
gcloud builds submit --tag "$REGION-docker.pkg.dev/$PROJECT_ID/$AR_REPO/$SERVICE_NAME"
```
The _gcloud builds submit_ command submits a build using Cloud Build. When used with the _tag_ flag, Cloud Build uses a Dockerfile to build a container image from the application files in your source directory.
Cloud Build is a service that executes builds based on your specifications on Google Cloud, and produces artifacts such as Docker containers or Java archives.
Wait until the command finishes before advancing to the next step.
### Deploy and test your app on Cloud Run
The final task is to deploy the service to Cloud Run with the image that was built and pushed to the repository in Artifact Registry.
1. To deploy your app to Cloud Run, run the command:
```
gcloud run deploy "$SERVICE_NAME" \
--port=8080 \
--image="$REGION-docker.pkg.dev/$PROJECT_ID/$AR_REPO/$SERVICE_NAME" \
--allow-unauthenticated \
--region=$REGION \
--platform=managed \
--project=$PROJECT_ID \
--set-env-vars=PROJECT_ID=$PROJECT_ID,REGION=$REGION
```
2. After the service is deployed, a URL to the service is generated in the output of the previous command. To test your app on Cloud Run, navigate to that URL in a separate browser tab or window.